Did you know that nearly every Tuesday, Stampin' Up! releases new downloads for My Digital Studio? They include designer kits, stamp sets, templates - many of which are exclusive to My Digital Studio.
You'll always have the freshest ideas for designing your projects when you use My Digital Studio!
My favorites this week: Chevron Punch Kit and More Candid Frames (look at those wonderful bright colors! Love this!) Click the "Jul 31" button to see more details of each download.
Tuesday, July 31, 2012
Saturday, July 28, 2012
My Digital Studio 2 Sneak Peak - Recoloring DSP
Take a look at another exciting sneak peek of My Digital Studio 2! Now you can re-color your Designer Series Paper backgrounds!
Friday, July 27, 2012
Tuesday, July 24, 2012
Convention 2012
Last week I attended the Stampin' Up! Convention in Salt Lake City, Utah. It is a magical experience created by the Stampin' Up! employees for demonstrators. They pamper us with special gifts, treats, fun, and best of all amazing ideas for stamped projects of all kinds. We get to touch and feel and try tons of the products from the catalogs and preview exciting new products that are soon to be debuted.
One of the things that I left with was a sense that this company is full of people who love their jobs and take pride in the products that they produce and sell. Their customer service is bar none. The employees all had a hand in putting the convention together - everyone from the executives to the shipping coordinators were on hand and involved.
It's a pleasure to represent them and I am proud of the amazing products that I'm privileged to sell.
This is a video made by the Stampin' Up! employees - it was the theme song created for the convention. Enjoy!
Check back here often - I have exciting sneak peeks of MDS 2 coming soon!
If you're interested in finding out more about becoming a Stampin' Up! Demonstrator click below.
Monday, July 16, 2012
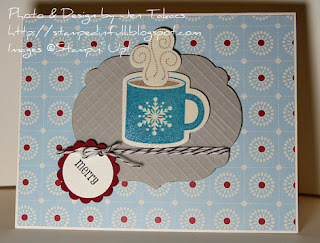
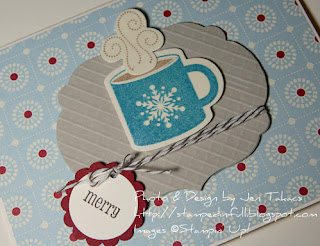
Peppermint Mocha
It was nearly 100 degrees here in West Michigan today. It has never been this hot here as long as I can remember. It has me actually wishing for one of our beautiful snow-drenched winters to come early. In fact, wishing for a snowy, cold Michigan winter day and my favorite winter warm-up, Peppermint Mocha, is what inspired this card.
There are lots of sneak peeks from the upcoming Holiday Catalog. So much cute stuff - coming August 1, 2012. This darling stamp set has coordinating Framelits and two flavors of scented embossing powder to choose from (I chose "Peppermint Sticks").
The waffle-look background of the framelit label was created using the Simply Scored scoring tool and the Diagonal Plate accessory.
And don't you love that scallop circle! It went quickly to the top of my must have list when I viewed the upcoming holiday goodies. It coordinates perfectly with the 1" circle punch - for stamping out and framing cute little sentiments or images. Adorable!
Supplies:
Stamps: Scentsational Season*, Pennant Parade
Paper: Very Vanilla CS, Festival of Prints DSP*
Ink: Early Espresso, Marina Mist, Crumb Cake, Versamark
Ribbon/Embellishments: Early Espresso Bakers Twine
Tools: Peppermint Sticks Scented Stampin' Emboss Powder*, 1 1/4" Scallop Circle Punch*, 1" Circle Punch, Big Shot, Labels Framelits Die, Holiday Collection Framelits*, Simply Scored, Simply Scored Diagonal Plate
*Items available beginning August 1, 2012 in the Holiday Catalog
Be Inspired! Create something beautiful!
- Jen
Saturday, July 14, 2012
Launch Day!
My husband and son love building rockets together (and blasting them off, of course), so I was thrilled to see the new stamp set "Blast Off" in the new Stampin' Up! 2012-2013 catalog. I was even more thrilled when a fantastic template for a board book using papers and embellishments in the same theme came out for MDS.
I picked pages from the board book template and added my favorite photos of my boys, arranging them in a somewhat chronological order, so it could follow a "countdown" of sorts.
Here's how they turned out. You can click on the photos to enlarge them for a closer look. The board book template lets you design in a 2-page spread, so that is how these images appear.
Even though these are pre-done templates you have the ability to edit them in any way you choose: you can add, delete, resize until you get the look you want. I changed and deleted a couple of elements and added my countdown buttons to the pages.
My favorite page is 3 in the countdown :)
This is a digital ensemble - Download includes:
* 1-page décor template (8-1/2" x 11")
* 1 double-sided postcard designer template (5" x 7")
* 1 greeting card designer template (4-1/4" x 5-1/2")
* 34-page board book template (8" x 8")
* 69-piece stamp brush set
* 12 Designer Series Papers
* 12 embellishments
* 2 punches
Click on the image to see more images in my online shop!
Friday, July 13, 2012
Beautiful Blossoms
The new Floral District Designer Series Paper is so bright and cheerful. I love the floral "explosion" that it inspires in me. To put this card together, I used a strip of Floral District DSP, a strip of Whisper White card stock stamped with the coordinating Betsy's Blooms Stampin' Around Wheel. The big dahlia like flower was created with the Blossom Petals Builder Punch. This flower was featured in Stampin' Success - the magazine for Stampin' Up! demonstrators, and is so easy to assemble.
Punch out 8 if the long thinner petals and 8 of the smaller thinner petals. Assemble them on a 1" circle - I used tombo all purpose glue to adhere the petals.
I inked the edges of the flower using my Tangerine Tango marker (punched out of First Edition Specialty Designer Series Paper) so it would stand out just a bit from the white background.
Supplies:
Stamps: Betsy's Blooms Stampin' Around Wheel, Memorable Moments
Ink: Old Olive
Paper: Daffodil Delight CS, Whisper White CS, Old Olive CS, First Edition DSP, Floral District DSP, Brights Patterns DSP
Ribbon/Embellishments: Daffodil Delight 1/4" Stitched Grosgrain Ribbon, Linen Thread, Brights Designer Buttons (119747)
Tools: Blossom Builder Punch, Scallop Border Punch, Big Shot, Little Leaves Sizzlit Die
Be inspired! Make something beautiful!
-Jen
Tuesday, July 10, 2012
Pals Summer Sunshine Blog Hop
My Summer Sunshine project is a scrapbook page made with My Digital Studio and one of the latest new digital kits "Spring Break II." It was love at first sight for me with this kit - it is so much my style.
I used a picture of my baby sister, April, caught in a moment of flower sniffing abandon. I knew the combination of this photo (one of my favorites of her) and the designer template included with the kit would be perfect. If you're unfamiliar with the digital templates - it simply means I didn't do any work other than insert a photo. This lovely page was already created for me.
In case you suspect that I'm some literary scholar, I will confess that although I do love poetry, I am not well read enough to have known the poem that I picked for this page (a play on words of my sister's name). I simply searched the internet for "poems about April" and found the perfect poem for my page.
Click the photo to enlarge
Digital Elements Used: Spring Break II Digital Kit (130852)
Now hop along for more inspiring ideas from Kimberly Deacon at Delightful Stampin stop number 13 on the Pals Summer Sunshine Blog Hop! Thanks for "hopping" by!
- Dawn Tidd at Tiddbits from Dawn
- Barb Furlong at The Love of Stamping
- Angie Blake at AngiesMusings
- Diane Roberts at Score at Four and a Quarter
- Marian Kay at All Aboard the Crafting Train
- Susan Lankford at Stamp and Scrap With Susan
- Shannon Jaramillo at ezpeasycards
- Rae Harper at Wild West Paper Arts
- Mary Fish at Stampin' Pretty
- Maggie Mata at Maggie Made Cards
- Angela Curry at Kindred Stampers
- Jen Takacs at Stamped in Full
- Kimberly Deacon at Delightful Stampin
- Nicole Watt at Impressions By Nicole
- Mikki Sarkisyan at Mikki's Creative Corner
- Nicole Picadura at Scraps & Stamps
- Nina Dee at Deesigns by Nina Dee
- Kim Luithle at Kims Stampin Stuff
- Lori Martin at The Rejoicing PaperCrafter
- Brian King at Stamp with Brian
- Maxine Conrad at Stamp to the Max
- Beth Beard at My Little Craft Blog
- Kim Czenszak at Live Love Stamp
Friday, July 6, 2012
Pals Paper Arts Challenge 138
The Pals Paper Arts Challenge this week is a color challenge using Early Espresso, Cherry Cobbler, and Daffodil Delight.
This is a combination I would never have considered, but I am amazed by how gorgeous it turned out to be! Definitely take the time to stop by the Pals Paper Arts website and view all the entries for this challenge. There are some works of art not to be missed!
I used one of my favorite stamp sets for this challenge: Tea Shoppe and incorporated it with new Framelits Apothecary Accents and the coordinating stamp set Layered Labels.
The yellow rose background I created using the rose from the "Papaya Collage" stamp set. I thought it coordinated well with the peony (which looks very rose-like to me) in the Tea Shoppe image.
I also set a small flower at the edge of my tea cup to continue the yellow flower imagery.
If you love one or all of the products I used making this card, simply click on the images below to be taken right to their page at my online shop!
Be Inspired! Make Something Beautiful!
-Jen
This is a combination I would never have considered, but I am amazed by how gorgeous it turned out to be! Definitely take the time to stop by the Pals Paper Arts website and view all the entries for this challenge. There are some works of art not to be missed!
I used one of my favorite stamp sets for this challenge: Tea Shoppe and incorporated it with new Framelits Apothecary Accents and the coordinating stamp set Layered Labels.
The yellow rose background I created using the rose from the "Papaya Collage" stamp set. I thought it coordinated well with the peony (which looks very rose-like to me) in the Tea Shoppe image.
I also set a small flower at the edge of my tea cup to continue the yellow flower imagery.
If you love one or all of the products I used making this card, simply click on the images below to be taken right to their page at my online shop!
Be Inspired! Make Something Beautiful!
-Jen
Subscribe to:
Posts (Atom)